Understanding Azure DevOps and Azure DevOps Pipeline Agent
What is Azure DevOps?
Azure DevOps is a set of development tools provided by Microsoft to support the entire software development lifecycle. It offers services for:
- Planning: Tools like Azure Boards help teams plan, track, and discuss work across the entire development process
Development: Azure Repos provides version control for source code.- Testing: Azure Test Plans offer tools for manual and exploratory testing.
- Deployment: Azure Pipelines automate the deployment of applications, making continuous integration and continuous delivery (CI/CD) easier.
- Collaboration: Azure Artifacts enables teams to share and manage packages.
What is Azure DevOps Pipeline Agent?
An Azure DevOps Pipeline Agent is a software component that runs jobs in your pipelines. Agents can be hosted by Microsoft (Microsoft-hosted agents) or self-hosted on your own machines (self-hosted agents). The key roles of an agent include:
- Running Jobs: Agents execute the tasks defined in your pipelines.
- Communicating with Azure DevOps: They communicate with the Azure DevOps service to report job status and results.
Types of Agents
- Microsoft-hosted Agents: Managed by Azure, these agents are pre-configured with popular development tools and frameworks.
- Self-hosted Agents: These agents run on your infrastructure, giving you control over the software installed and the resources used.
Benefits of Using Pipeline Agents
- Customization: Self-hosted agents allow customization for specific builds or deployments.
- Performance: They can be optimized for performance based on your environment.
- Security: Self-hosted agents can be run in a secured environment with restricted access.
How to Install a Self-hosted Azure DevOps Pipeline Agent
Prerequisites
- Azure DevOps Account: Ensure you have an Azure DevOps organization.
- Permissions: You must be a member of the Project Collection Administrators group or have the necessary permissions to create agents.
- Machine Requirements: The machine where the agent will run should meet the system requirements and have access to the Azure DevOps organization.
Step-by-Step Installation Guide
Create a Personal Access Token (PAT):
- Go to your Azure DevOps portal.
- Click on your profile picture in the top right corner and select Security.
- Click on New Token, set a name and expiration, and select the scopes required (usually
Agent Pools (read, manage)).
Download the Agent Package:
- Navigate to Project Settings in your Azure DevOps project.
- Under Pipelines, select Agent Pools.
- Click on the agent pool you want to use (or create a new one).
- Click on New Agent.
- Choose your operating system and follow the provided instructions to download the agent package.
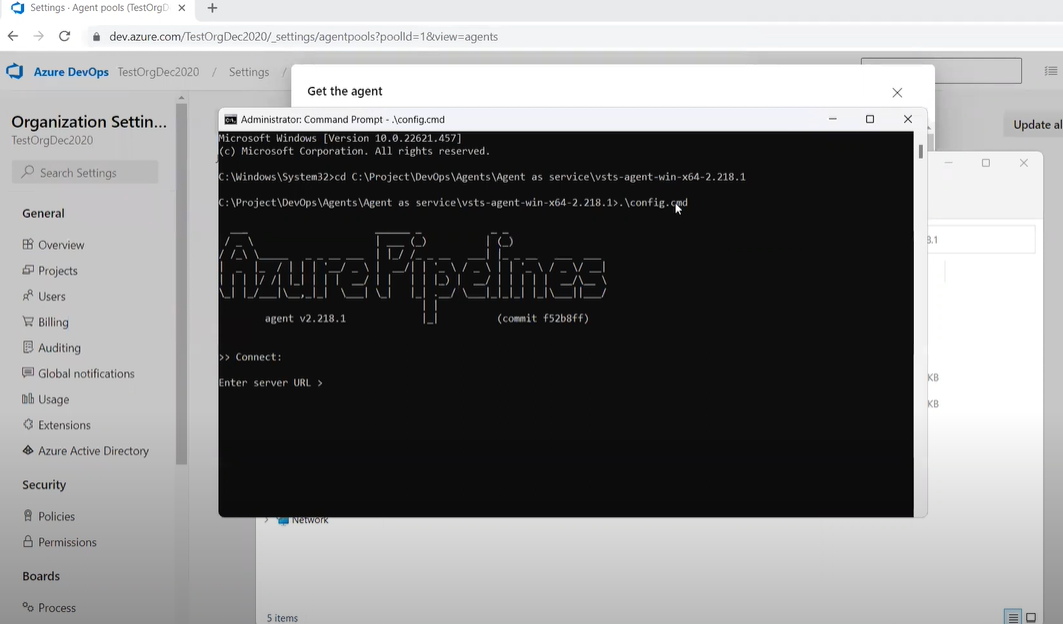
- Enter your Azure DevOps URL.
- Provide your PAT.
- Choose the agent pool.
- Specify the agent name.
- Decide whether to run the agent as a service.
4. Run the Agent:
- If you chose to run it as a service, it will start automatically. If not, you can start it manually using:
5. Verify Installation:
- Go back to Azure DevOps and check the Agent Pools under Project Settings.
- Your newly installed agent should appear in the list and be online.
Conclusion
Azure DevOps provides a powerful platform for managing your software development lifecycle. Using Azure DevOps Pipeline Agents, especially self-hosted agents, allows you to customize and optimize your CI/CD processes. By following the steps outlined above, you can successfully install and configure a self-hosted agent to meet your project's needs.


